Decks Guide
How to Calculate Deck Stair Stringers
Deck stair stringers are the sloped structural members that support the stair treads and risers.
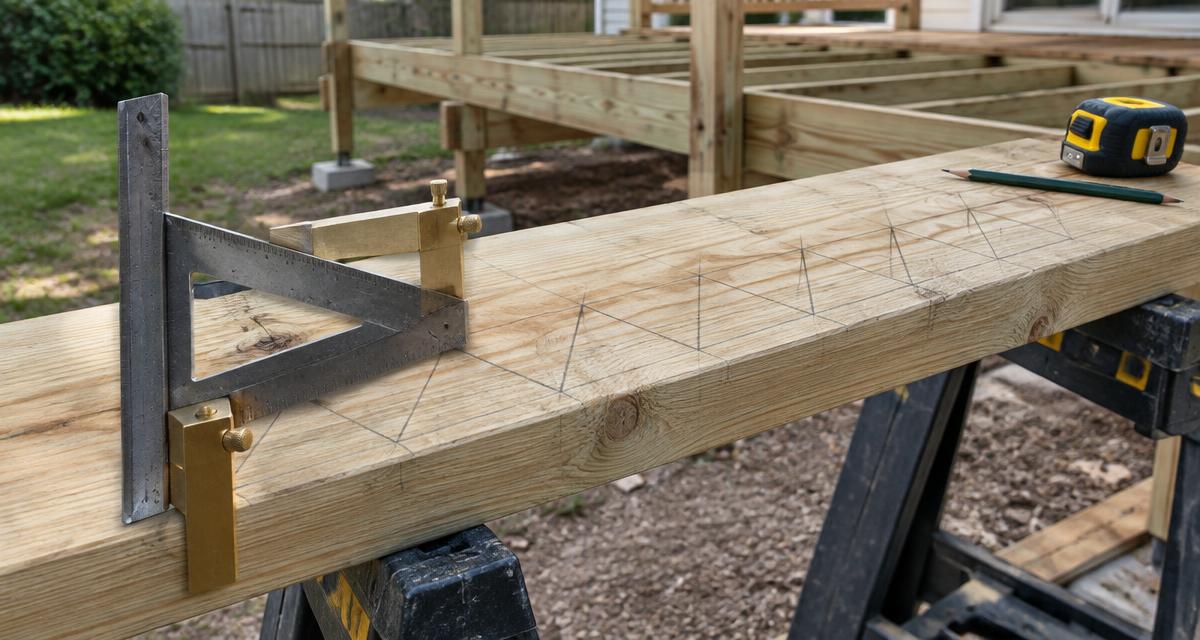
Before you mark or cut a stringer, you need to know the basic stair geometry:
- total rise
- number of risers
- exact riser height
- number of treads
- tread run
- total run
- tread thickness
- top attachment method
- finished landing height
Once those measurements are known, the rise and run can be transferred repeatedly onto the stringer to create the stair layout.
The basic process is:
- Measure the total rise.
- Determine the number of risers.
- Calculate the exact riser height.
- Determine the number of treads.
- Choose the tread run.
- Calculate the total run.
- Estimate the stringer slope length.
- Lay out the rise and run on the stringer.
- Adjust the top and bottom for the actual stair assembly.
- Test the first stringer before copying it.
You can use the BuildCalcWorks Deck Stair Calculator to calculate the main stair dimensions automatically before laying out your stringers.
What Is a Deck Stair Stringer?
A stair stringer is the inclined structural member that supports the stair treads.
For a typical cut stringer, a repeating stair-step pattern is cut into the upper edge.
Each step in that pattern is based on two measurements: Rise and Run.
The rise controls the vertical distance between steps.
The run controls the horizontal distance of each step.
Several correctly sized stringers are normally installed across the width of the staircase to support the treads.
The required number and spacing of stringers depends on the stair design and tread material.
Calculate the Deck Stairs Before the Stringer
The stringer layout comes from the stair calculation.
Do not start marking a stringer before establishing:
- total rise
- riser height
- tread run
- number of risers
- number of treads
- total run
If those measurements are wrong, every notch on the stringer will also be wrong.
If you have not calculated the staircase yet, see How to Calculate Deck Stairs or use the BuildCalcWorks Deck Stair Calculator before continuing.
Step 1: Measure the Total Rise
The total rise is the vertical distance from the finished landing to the finished deck surface.
Measure to the final surfaces, not simply unfinished framing or existing soil.
That is the first measurement used in the stringer calculation.
Step 2: Calculate the Number of Risers
A preliminary riser height can be used to estimate how many equal rises are needed.
Use
Number of Risers ≈ Total Rise ÷ Target Riser Height
Next, calculate the exact riser height.
Step 3: Calculate the Exact Riser Height
Use
Exact Riser Height = Total Rise ÷ Number of Risers
This rise measurement becomes one side of the repeating layout marked on the stringer.
The final stair dimensions must still be checked against the requirements that apply to the project.
What If the Rise Does Not Divide Evenly?
You should lay out equal risers based on the actual calculated value rather than rounding heavily and making one step different.
Accurate riser layout is one of the most important parts of stringer planning.
Step 4: Calculate the Number of Treads
For many common deck stair configurations:
Number of Treads = Number of Risers - 1
For example, 6 risers may result in 5 stair treads before reaching the deck surface.
This relationship matters when calculating the total horizontal run.
The exact top configuration should still be considered when laying out and attaching the finished stringer.
Step 5: Choose the Tread Run
The tread run is the horizontal portion of each repeated stair step in the stringer layout.
Use
Total Run = Number of Treads × Tread Run
The final tread/run dimension must comply with the applicable stair requirements and work with the actual tread material.
Step 6: Estimate the Stringer Slope Length
Once you know the total rise and total run, you can estimate the overall diagonal length using the Pythagorean theorem.
Use
Approximate Stringer Slope Length = √(Total Rise² + Total Run²)
This is useful for understanding the overall stair geometry and selecting material length.
However:
65.3 inches is not automatically the final finished stringer cut length.
The actual stringer also depends on:
- top connection
- bottom cut
- tread thickness
- landing arrangement
- framing details
Complete Stair Stringer Calculation Example
Suppose your deck stair has:
- Total rise: 42 in
- Number of risers: 6
- Tread run: 10 in
Basic stair geometry:
- Total rise: 42 in
- Risers: 6
- Rise per step: 7 in
- Treads: 5
- Run per tread: 10 in
- Total run: 50 in
- Approximate slope length: 65.3 in
These values provide the geometry needed to begin the stringer layout.
How to Lay Out a Stair Stringer
Once the rise and run are known, the repeating stair pattern can be marked.
A framing square is commonly used.
One side represents the rise and the other the run.
For our example: Rise: 7 in Run: 10 in
Position the framing square against the stringer material and mark both measurements.
Then move the square along the board and repeat the pattern for the required number of steps.
Each repeated layout should use the same calculated rise and run.
Why Stair Gauges Can Help
Stair gauges are small clamps that attach to a framing square.
They allow the same rise and run measurements to be positioned repeatedly without resetting the square each time.
For example: One gauge: 7 in rise. Second gauge: 10 in run.
The square can then be moved along the stringer while maintaining the same stair geometry.
This can reduce layout errors.
Mark Before You Cut
Lay out the entire first stringer before making cuts.
Check:
- number of steps
- rise
- run
- total length
- top connection
- bottom landing
- tread thickness
A mistake in the first layout will otherwise be copied into every stringer.
Careful checking before cutting can save a significant amount of lumber.
Bottom Stringer Adjustment for Tread Thickness
One of the most important stringer details is the bottom adjustment.
Once tread boards are installed, their thickness raises each walking surface.
The landing at the bottom does not receive another stair tread below it.
Therefore, the bottom of the stringer commonly needs to be shortened by the tread thickness so that the finished first rise matches the remaining finished risers.
This does not mean the finished first rise becomes 6 inches.
Once the 1-inch tread is installed above it, the finished walking-surface-to-walking-surface rise becomes 7 inches.
This adjustment is critical for consistent finished riser heights.
Why Tread Thickness Matters
Suppose every notch is laid out with 7-inch rises but no adjustment is made at the bottom.
After adding a 1-inch tread to the first step, the first finished step could end up with a different rise from the rest.
Stringer calculations must therefore consider the stair after the tread material is installed, not only the bare wood stringer.
Always use the actual tread thickness for your project.
Top Stringer Adjustment
The top of the stringer also depends on how it connects to the deck.
Possible configurations include attaching the stringer:
- to the face of the deck framing
- below the rim
- to dedicated stair framing
- using approved stringer connectors
- using another project-specific connection
If a riser board is installed at the top, its thickness can affect the upper run dimension.
The exact adjustment depends on the framing arrangement.
Do not automatically copy a generic top cut without considering how the stringer will actually connect to the deck.
The Top Connection Is Structural
The top of the stringer must transfer stair loads safely into the deck structure.
This is more than a measurement issue.
The attachment method can involve:
- blocking
- reinforced framing
- approved connectors
- fasteners
- dedicated stair support framing
Use the structural details and connector requirements appropriate to the deck design.
Do not rely on unsupported end-grain fastening as a substitute for a properly designed stair connection.
Landing Support Matters
The bottom of the stringer must bear properly on the finished landing or approved support.
The landing should provide:
- stable support
- proper elevation
- suitable drainage
- sufficient area for the staircase
Do not finalize the stringer until the landing height is known.
Changing the landing elevation changes the total rise and therefore changes every riser measurement.
How Many Stair Stringers Do You Need?
There is no single stringer count that works for every deck stair.
The required number depends on:
- stair width
- tread material
- maximum tread span
- stringer spacing
- stair design
- decking manufacturer requirements
Composite decking can require stringers much closer together than some wood tread systems.
Always check the maximum stair-tread span or stringer spacing allowed by the actual decking product.
Do not assume that a spacing used for one material is acceptable for another.
Why Composite Treads Often Need More Stringers
Many composite deck boards have lower allowable stair-tread spans than dimensional wood.
That can require closer stringer spacing.
For example, one composite product may require stringers much closer together than another product.
The exact requirement is product-specific.
Before building the stairs, check the installation manual for:
- stair tread span
- required stringer spacing
- fastening
- overhang
- stair-specific installation details
First Stringer as a Template
Once the first stringer is:
- fully marked
- correctly cut
- test-fitted
- confirmed against the deck and landing
it can often be used as a template for the remaining stringers.
Trace the first stringer onto the remaining material.
This improves consistency.
Do not use the first stringer as a template until you have confirmed that it fits correctly.
Avoid Over-Cutting Stringer Notches
When cutting the stair-step notches, avoid extending the saw cut significantly beyond the corner of the layout line.
Over-cutting removes additional material and can weaken the stringer.
A common approach is to make the main cuts carefully and finish the inside corner with a suitable hand saw or jigsaw rather than forcing the circular saw beyond the marked intersection.
Stringer Material Matters
Cut stringers remove a significant amount of material from the original board.
Because stringers are structural components, the material must meet the requirements of the stair design.
Do not assume that any available board can safely be used as a stair stringer.
Requirements may specify:
- minimum board dimensions
- lumber species
- grade
- treatment
- remaining material depth
- maximum unsupported span
Follow the structural requirements applicable to the project.
Stringer Span Matters
A long staircase places greater demands on the stringers.
Depending on:
- stringer material
- species
- grade
- stair geometry
- notching
- structural design
there may be limits on how far a stringer can span unsupported.
Long stair flights may require:
- intermediate support
- posts
- beams
- intermediate landing
Do not assume that any stringer can safely span the entire staircase simply because the board is long enough.
Example with a Taller Deck
Suppose: Total rise: 56 in. You evaluate: 8 risers
Again, this is the basic slope geometry—not the final cut length or structural approval of the stringer.
Converting Feet and Inches
Stringer calculations are easier when all dimensions use one unit.
Use 56 inches throughout the calculation.
Convert back to feet only if useful afterward.
Metric Stringer Calculations
The same formulas work in metric units.
Again, the diagonal is useful for planning material length but does not replace final structural/stringer layout details.
Common Deck Stair Stringer Calculation Mistakes
Starting with the Stringer Instead of the Stair Geometry
Calculate the entire staircase first.
Using the Wrong Total Rise
Measure from the finished landing to the finished deck surface.
Rounding the Riser Height Too Early
Use the actual calculated rise when laying out the stringer.
Forgetting Tread Thickness
The bottom stringer commonly requires adjustment.
Assuming the Top Cut Is Always the Same
Top attachment varies by deck design.
Cutting Before Checking the Entire Layout
Mark and verify the first stringer completely before cutting.
Copying an Incorrect First Stringer
Test-fit the first one before using it as a template.
Over-Cutting Notches
Cut only to the layout lines and finish corners carefully.
Using Too Few Stringers
The tread material determines how far it can span between supports.
Assuming Wood and Composite Treads Use the Same Spacing
They may require very different stringer spacing.
Ignoring Stringer Span
Long stair flights may require additional structural support.
Ignoring the Landing Height
A changed landing elevation changes the entire stair calculation.
Once the stair geometry is known, transfer the calculated rise and run measurements carefully to the stringer.
Always verify the final stair and stringer design against the structural requirements, local building rules, connector requirements, and decking manufacturer instructions that apply to your project.
Related Calculators
Related Guides
Decks
How to Calculate Deck Stairs
Learn how to calculate deck stairs using total rise, number of risers, riser height, tread run and total stair run, with an easy worked example.
Read guideFrequently Asked Questions
Calculate First, Cut Second
Deck stair stringers become much easier to understand once the entire stair geometry has been calculated.
The process is:
- Measure the total rise.
- Determine the number of risers.
- Divide the total rise evenly to get exact riser height.
- Determine the number of treads.
- Select the tread run.
- Calculate total run.
- Estimate the overall diagonal length.
- Mark the repeating rise and run on the stringer.
- Account for tread thickness and top attachment.
- Test-fit the first stringer before copying it.
Those measurements define the basic stair shape.
The final stringer must then be adjusted for the actual tread thickness, landing, deck connection, material, stringer spacing, and structural requirements.
For the quickest starting point, use the BuildCalcWorks Deck Stair Calculator before laying out your first stringer.
Disclaimer: This guide provides layout and planning calculations only. It does not certify code compliance or determine structural design. Stringer size, material, span, spacing and connections must follow the structural requirements, local building rules and manufacturer instructions that apply to your project. Read full Disclaimer.